Showing posts with label Make-Up. Show all posts

1/26/2011

Early Life Crisis

  I have been entirely too stressed as of lately. My anxiety has been tested, pushed to its limits and I'm both physically and emotionally exhausted from it. Not that I want to get too detailed - especially via internet - but my mum has been going through yet another stressful patch and I worry about her so intently. Nonetheless, I am weighing my current options:

- Go for my work interview.
- Work full-time for a month or so.
- Get a small one-bedroom apartment or find a roommate and get a nicely sized two-bedroom.

OR
- Stay living at home.
- Save money for school despite my education fund.
- Go insane.

  Alas! I have had a break-through with future plans for the time being, ignoring the fact that I change my goals on a fairly regular basis. However, my mum was a very high-esteemed hair dresser and she used to get so fed up with me wailing at her when I was young that she wasn't doing my hair the way I wanted that she taught me how to do it myself. So I've been teaching myself how to work with hair (after many failed practice runs on my own poor head) for about 8 years and it has become second nature to me. Now of course all of my friends and their friends and family come to me to get free hair cuts/dye jobs, and I wonder to myself, "Why am I not getting paid to do this?".
  As I am naturally one of the most indecisive people I know, I have not been able to simply look through school programs or take tests to see what I would be best at and say, "This is it! This is what I want to do," without considering a dozen other options at the same time. Of course this contributes to my anxiety where I feel my feet are nailed to the floor and I can't move in any direction without fear of regret. The conclusion I came to was this: I will go to aesthetics school, which is only about 9 months (my city has 3 of the best aesthetics schools in Canada), after which I could get a job in a salon doing both hair and make-up. Hopefully at that point I will have some sort of better idea as to what I want to take in university (right now I'm leaning toward international law but that could change in 5 years or 5 minutes) and be making money just in case the current funding I have isn't enough.
  This is a good plan right? This will be a trade I can have for the rest of my life, because who knows when or if things will ever get tough - I'll always have a back-up safety net.

Kate's prom make-up (it went so nicely with her dress but I'm lacking more photos!)

She was so insistent that the curls wouldn't hold with her thin, pin-straight hair.

Up-dooo

They held.       


And here are some of the stupid things I did with my hair, but the really embarrassing ones are staying hidden.
BLEACHED2SHIT

THE BOY CUT

THE UNDERCUT

THE UNDERCUT - RACING STRIPES EDITION

THE TUCKED MULLET

1/19/2011

Slopped

  Today I sent in an application to the modeling agency my mother went to in her youth because she's been bantering me about it for the past 2 years - we'll see how that goes.
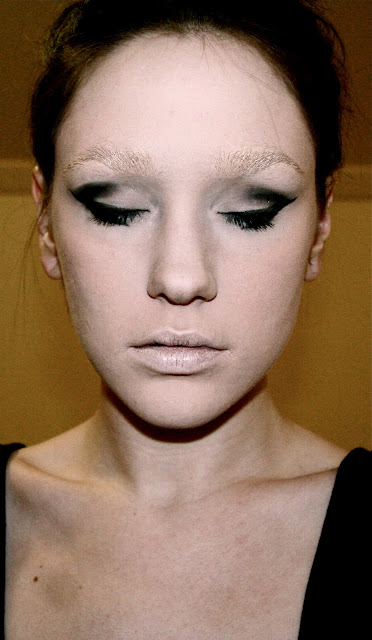
  This is unfortunately just a quick update of a poorly slopped-together outfit, but I was asked for a bit of a tutorial on how to do an intense eye/cat-flick. I was silly and forgot to take step-by-step photos but so I hope my descriptions prove helpful!

black over-sized tank - Old Navy, asphalt high waisted skirt - Joe Fresh,
black hoop belt - Stolen from mama's closet, platform zipper shoes - Aldo


1. Prep your face however you like best, but keep it basic and even-toned.
2. Take your concealer and put it on an eyebrow brush/clean mascara brush and work it through.
3. I used concealer on my lips because they're naturally rosey and I only wanted my eyes to be the focus.
4. Use a pale cream or grey for the base colour of your eye going from lash line to just above your natural crease as well as your lower lash line.
5. Take a rounded shadow brush and use a few shades darker cream/grey to work into your crease for smooth transition.
6. Take a small shadow brush and slowly build from the outer corner of your lash line out and back in again to your crease - don't go as far in as step 5.
7. Take a thin angled brush and follow your lash line to create a sharper edge.
8. **Optional: Use the same brush to follow your lower lash line 1/2-3/4 of the way in.
9. **Optional: Use the same brush again to follow the outer corner of your lower lash line and create a V shape the same length as step 8.
10. If necessary, use a liquid liner/whatever preference you have and sharpen the bold lines then add your mascara!

**Sidenote: you can stop at step 7 and just add mascara to your upper lashes only as I obviously dramatized my look more than I would for normally going out.

And voila!


1/13/2011

Rose

  I spent a lovely late weekend with the boy, filled to the brim with marathons of LOST, conversation, laughter and understanding. Oh, and sushi - Sushi Sushi Sushi.
We made our way to downtown to visit a cozy little Japanese place named Ye's which has a simplistic and warm atmosphere. Though it is not the best I have ever tasted (not to be discrediting them on the flip-side), it is relatively the closest and takes but a simple 5 minute walk. He ordered tea and watched my face as the aroma entered my nostrils and my brain pre-registered what the flavour would undoubtedly be and to my own satisfaction - I still do not condone that tea is a pleasant beverage. He ordered rice, tempura shrimp and spicy crispy salmon rolls (a mutual favourite) while I got a little indulgent off the All You Can Eat menu. Stuffing myself silly with edemame that were perfectly salted, tempura vegetables/crab/scallops, along with two servings of my own spicy crispy salmon rolls and other sashimi pieces. I made an attempt at BBQ eel but could not psych myself into the task after looking at the creature (scale-y and blue tinged, blegh!), then when we finished we snuck some extra rolls into a take out container to save for later.
  The Sunday-Wednesday duration had its ups and downs, but we came to such a comfortable understanding from the get-go that set the mood for the rest to follow, I felt the sweet relinquished the sour and now find myself quite content and prepared for what I can only classify as Life.
  Prior to the visit I promised to upload some tutorial/'look'-based photos after I was loosely geisha inspired by the dark clothing combined with an alabaster demeanor/burst of colour, which are now here and waiting speculation! Forgive the low-quality as I no longer own a tripod or remote and had to compensate.
Creme scarf - Le Chateau, Black loose-layered cardigan - 2nd Hand
Shiny embroidered tights - Vintage, Platform peep toe heels - Aldo


I've separated this tutorial into two versions, the first being the following.
Part One:
1. Prep your face by exfoliating all dry skin from both your face and lips - make sure you're well moisturized.
2. Create a base to have the perfect coverage of your entire face, including eyelids, outline of your lips, and extending down your neck. I used Natural FX in E0, Conceal FX in X-Light, and Powder FX in E0 (this is a water-based liquid foundation, concealer and powder).
3. Brush talcum powder over your entire face using a powder brush (this is only necessary for anyone already pale, if you are darker toned, just use a few shades lighter).
4. The blush I used was a gift from my aunt who did not include the box so I am unsure what the name is, but it was a demo line at her spa named Trend and Basic Collection. Use an angled blush brush and begin by heavily applying along the curvature of your cheekbones up to your temples, ending near mid-eyebrow.
5. Using a pure white E/S, cover your entire eye from lash line up to brow, and tear line to upper cheekbone. If you have white liner/mascara I would suggest trying that as well.
6. If you want, add a small bit of your blush-matching lipstick to the center of your lips discreetly, then add a subtle bit of gloss.
To avoid over-crowding your face, choose between adding to your lips or eyes. These are lip examples.
These are eye examples.
 Part Two:
1. Add concealer to your lips to blend them into your face making them more unnoticeable and keeping from drawing away attention from your eyes. Depending on your concealer, add a sealant cote on top of this.
2. Taking a black sharpened pencil create a dotted line for the perfect cat-flick shape.
3. Fill this in (it's ok if it's not perfect).
4. Using a thin angled brush with black E/S (have water near-by for dunking) or liquid liner, carefully overlap these lines with precision.
5. Curl lashes and add mascara to upper lashes only!

Voila!